Is your building Recycle Ready? #
Water conservation is becoming increasingly important, and greywater recycling is an effective way to reduce drinking water and waste water production. Hydraloop enables you to reuse water from showers, baths, and washing machine for non-drinking purposes such as flushing toilets, laundry, watering gardens and topping up pools.
However, before installing a Hydraloop, your plumbing must be Recycle Ready. This guide will help you determine whether your building meets the necessary requirements or what modifications may be needed.
Check if your piping is configured correctly with this interactive tool that allows you to specify the water recycling requirements for your property by selecting the optimal installation location and identifying connected fixtures.
What does “Recycle Ready” mean? #
In most conventional plumbing systems, all wastewater is sent directly to the sewer. This includes greywater (from showers, baths, and washing machines) as well as blackwater (from toilets and kitchen sinks). While blackwater must always be drained, greywater can be treated and reused safely thus helping to conserve both drinking water and wastewater. It will also reduce utility costs.
Being Recycle Ready means your plumbing system is correctly set up to work with a Hydraloop, ensuring efficient greywater collection, recycling and reuse.
How does Hydraloop work? #
Hydraloop treats greywater using a natural process using an aerated bioreactor, similar to those used in large-scale wastewater treatment facilities. The system collects greywater, removes contaminants and receives regular UV disinfection to make it suitable for reuse in non-potable applications.
For the system to function properly, it requires:
- A dedicated greywater drain;
- An overflow connection and an open-to-air vent to maintain proper drainage;
- An internet connection to connect to the Hydraloop Device Manager (HDM)
The HDM allows you to monitor the greywater recycling process and provides remote access for maintenance and troubleshooting when needed.
Verifying Recycle Readiness #
Before purchasing a Hydraloop system, it is important to ensure the building is suitable for in property water recycling. Review the requirements with your Hydraloop partner to prevent unexpected issues later in the process.
If any plumbing activity is planned, make sure the Recycle Ready Pre-Checklist is completed in advance. This should be done in cooperation with a qualified installer and submitted before plumbing begins. It helps confirm that all system requirements will be met and avoids unnecessary delays or modifications.
Before Hydraloop installation and verification, submit the Recycle Ready Confirmation Checklist. This confirmation secures that all plumbing conditions prior to Hydraloop installation and verification have been met. The Hydraloop verification will then confirm whether the system is ready for commissioning and proper operation.
Recycle Ready plumbing schematic #
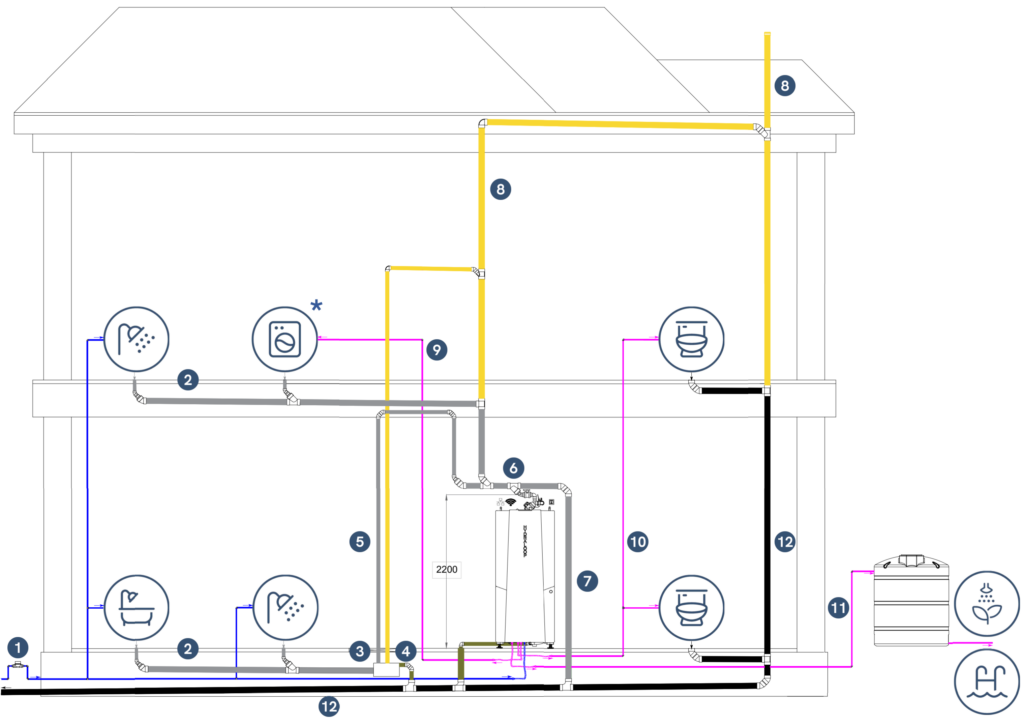
| Legend | |||||
| Tap water |  | Recycled water |  | ||
| Grey water |  | Waste water |  | ||
| Drain vents |  | ||||
| 1 | Tap water supply | 7 | Overhead bypass to sewer | ||
| 2 | Grey water drain | 8 | Open to air vent pipe | ||
| 3 | Lift pump installation | 9 | Recycled water, washing machine | ||
| 4 | Lift pump overflow (incl. sewer check valve to prevent backflow according to EN 12056 or local regulations) | 10 | Recycled water, toilets | ||
| 5 | Pressure drain | 11 | Recycled water, garden or pool (open pipe connection or float valve in tank) | ||
| 6 | Hydraloop greywater inlet, 2200 mm center line inlet height (incl. optional inlet diverter because washing machine discharge connection) | 12 | Black water / sewer drain | ||
* When washing machine greywater is recycled, an inlet diverter must be installed.
Hydraloop connections #
Greywater inlet #
Hydraloop collects the greywater at the top of the device. The greywater enters the Hydraloop in the middle of the first tank (T1). All connections are neatly stored behind the removable front plate, as visible in the image below.
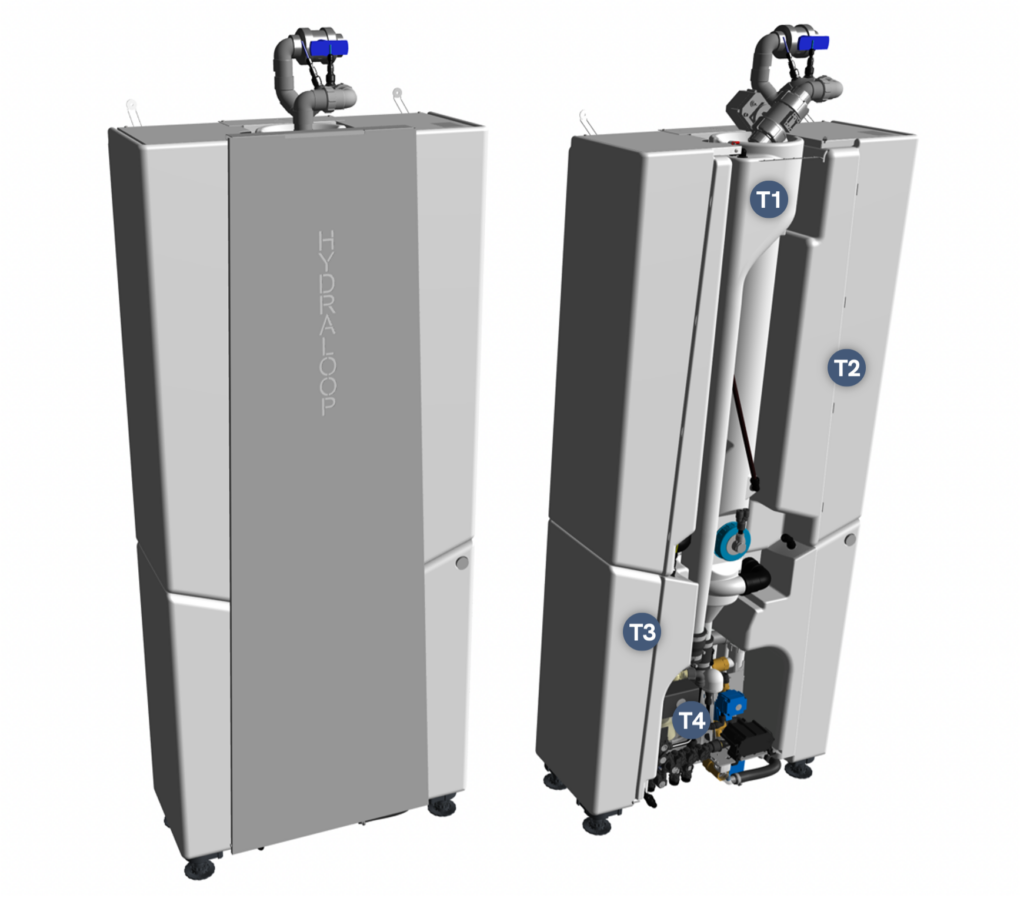
Image: Hydraloop H300. Left; with front plate, standard inlet. Right; without front plate and optional inlet diverter.
The image above also indicates the 4 tanks of which the Hydraloop consists of:
- T1; Greywater inlet tank
- T2; Bioreactor tank with moving bed bioreactor (MBBR)
- T3; Storage tank which holds recycled water
- T4; Tank for backup water connection, complete with safe air gap
Overhead bypass to sewer (#7 Plumbing diagram) #
When installing the grey water drain it is important not to restrict the internal diameter. Restricting the diameter downstream will negatively affect the functioning of the plumbing installation and the Hydraloop.
Because the inlet into the Hydraloop is 40 mm, it is important that an overhead bypass is created, see plumbing diagram. Make sure the Y-junction that drops towards the Hydraloop is full bore, pointed down and in line with the flow to maximize the amount of water running into the Hydraloop.
After passing the Hydraloop inlet, connect the overhead bypass to the sewer connection. Make sure backflow of sewer water, or black water is made impossible. If necessary, include a non-return valve. Backflow of sewer water will harm the functioning of the Hydraloop.
Distribution module #
Recycled water is collected in the holding tank (T3) at the bottom of the Hydraloop. This is where the distribution unit is located. When the front plate is removed, all connections are visible. The image below indicates the locations of the recycled water outlets, backup water inlet and drain outlet.
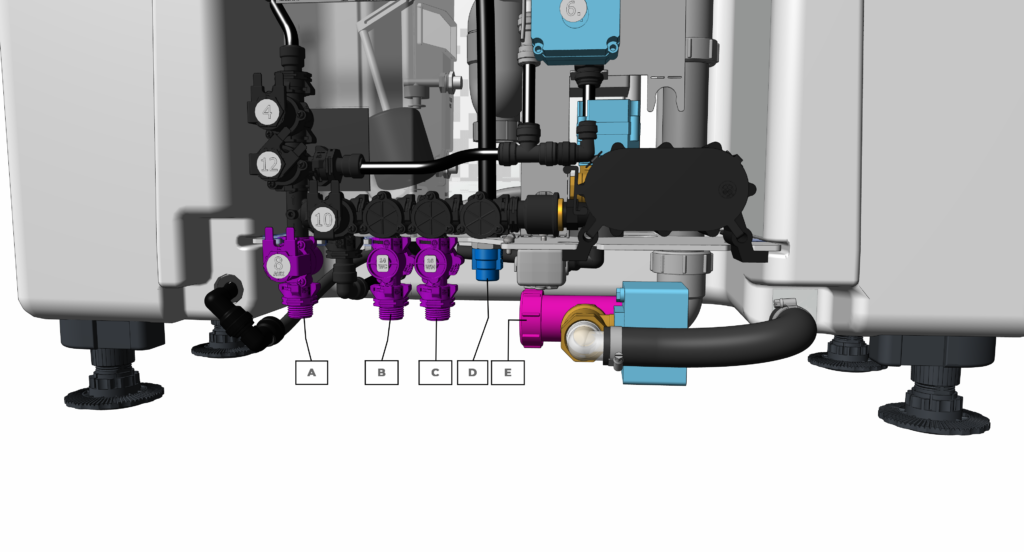
| A | ‘AUX’ Auxiliary outlet * | D | Backup water inlet |
| B | ‘WC’ Toilet(s) outlet | E | Drain to sewer outlet |
| C | ‘WM’ Washing machine outlet | ||
* Auxiliary outlet is always present, but to activate must be ordered as add-on
Pipework placement #
To ensure proper pipe placement for recycled water, backup water and drain to sewer connection, see image A (bottom view) and image B (side view). The feet are height adjustable for levelling purposes. Clarification of the numbers as shown in image A:
| 2 | ½” Auxiliary outlet: connect with flexible hose provided |
| 3 | ½” Toilet feed: connect with flexible hose provided |
| 4 | ½” Washing machine feed: connect with flexible hose provided |
| 5 | ½” Backup water: mains tap water, rainwater or well water: connect with flexible hose provided |
| 6 | Wastewater to sewer. 40 mm sewer connection with rubber gasket |
Image A: bottom view H300, measurements in mm:
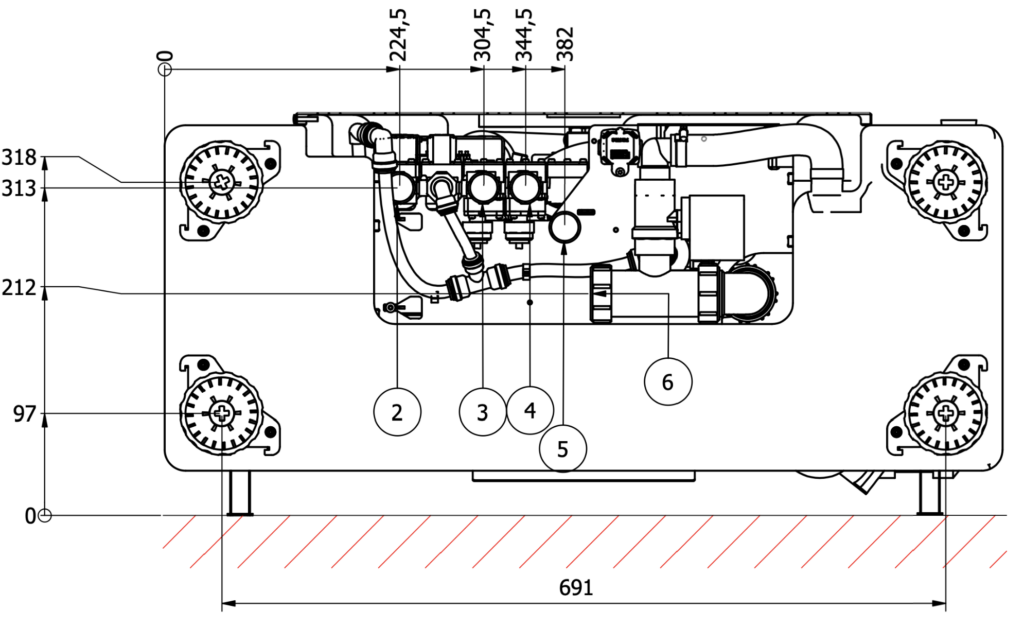
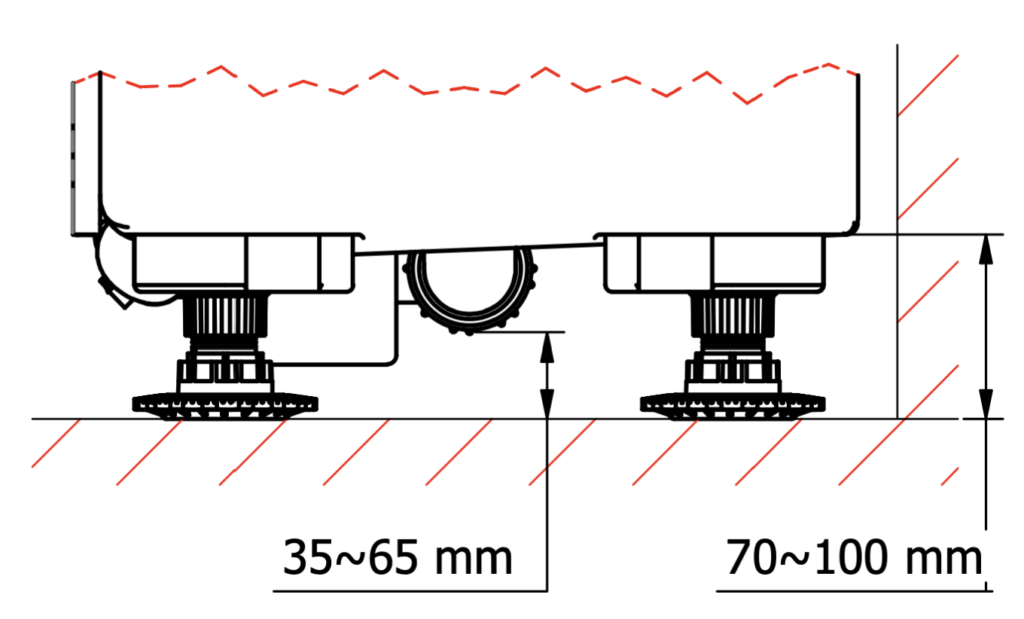
Image B: side view H300 showing drain in middle, measurement variation due to height adjustable feet.
The water and waste connections can be made in the free space underneath the Hydraloop, or next to the Hydraloop, depending on the configuration. Please contact your qualified installer or Hydraloop for expert advice.
When the building and installation is in use before the Hydraloop is placed, connect the water lines to the tap water so all fixtures can be used. Install a backflow prevention device when local plumbing regulations require this.
Water demand calculation #
To keep the installation simple, first determine if recycling your washing machine’s greywater is necessary. Follow these two steps:
- Calculate your recycled water demand (litres per day):
- Toilet: Flushes per day × Flush volume × Number of people
- Washing machine: Litres per cycle × Cycles per day
- Calculate your greywater production (litres per day):
- Shower: People × Showerhead flow rate (L/min) × Shower duration × Showers per day
Note: Only 92% of the greywater is reusable, as Hydraloop uses 8% for cleaning.
Decision rule: If your recycled water demand is lower than your greywater production, recycling washing machine water is unnecessary.
For a quick assessment, try our Hydraloop Calculator
Inlet plumbing options #
Hydraloop on lower level – input by gravity #
Greywater from the shower/bath or other sources is drained via a conventional gravity-fed sloped drain to the top of the Hydraloop. Ensure the greywater drain to the Hydraloop is connected to an open-to-air ventilation line and according to local plumbing regulations.
Hydraloop on the same level – input via lift pump installation #
Greywater from the shower/bath or other sources enters the device through a lift pump installation. Ensure sufficient open-to-air ventilation from and to the lift pump and drainage fixtures. Always follow the lift pump manufacturers’ installation requirements.
Other lift pump considerations:
- Volume: Ensure the maximum volume of the lift pump holding tank is 50 litres. Larger volume tanks are known to negatively affect the grey water quality.
- Drain ventilation: Ensure open-to-air ventilation for the lift pump by installing a vent stack. Make sure the ventilation complies with local plumbing codes. If only a lift pump supplies the Hydraloop, the incoming gravity fed grey water drain into the Hydraloop also needs to be properly vented.
- Maximum flow: Choose a lift pump that has a maximum flow of 45 l/min or throttle the inlet flow.
Optional: Inlet diverter for washing machine #
When recycling greywater from washing machines, you need to order the optional inlet diverter. The inlet diverter is a 2-way valve which closes during the first two rinse cycle of the washing machine. You must supply recycled water to the washing machine from the ‘WM’ outlet when you collect greywater from the washing machine.
Below is an overview of the current models which are fitted with an inlet diverter.
| HYDRALOOP MODEL | INLET DIVERTER |
| Hydraloop H300 collection ‘25 | No |
| Hydraloop H300 collection ’25 with inlet diverter | Yes |
Sewage pump after Hydraloop #
If the Hydraloop is installed in a basement or any location lower than the main sewer line, a macerator sewage pump is needed to move the wastewater from the Hydraloop up to the sewer.
During the weekly cleaning cycle of the Hydraloop T1 and T2, or when unused recycled water in T3 is automatically drained, a large amount of water is flushed out at once.
To prevent flooding during these flushes, the macerator sewage pump must be able to handle a flow rate of at least 2 l/s.
We also recommend installing a non-return valve to stop wastewater from flowing back towards the Hydraloop.
Requirements #
Below are the system requirements. More information can be found in our FAQ:
| Location/placement: | Inside the building thermal envelope. Hydraloop is not IP rated or UV resistant. Avoid direct sunlight and rain. Maximum RH-value: 70% Recommended positions are: mechanical or technical room, garage, laundry and garage. Due to possible 24-hour sound production, it is not recommended in or adjacent to living space or quiet rooms. For systems sounds, see Specifications. |
| Temperature | Average operational ambient temperature 14-35 °C. |
| Service space: | 80 cm in front of Hydraloop. |
| Greywater inlet: | 40 mm O.D. PVC. height min. 2200 mm CL. Only shower/bath water, washing machine (max. 1, with inlet diverter). No kitchen sinks, dishwashers, floor drains or human waste. Do not sit/stand on the Hydraloop. Do not use it for storage, leave top free for access. |
| Drainage connection: | 110 mm. Hydraloop has 40 mm I.D. union clamp connection. Max. discharge volume is 2 l/s at cleaning cycle |
| Electrical power: | 230 V, 50 Hz, 15-16 Amp (120 V, 60 Hz, 15-16 Amp US/CAN) earthed wall outlet within 1.2 m from top center of Hydraloop |
| Internet connection: | Ethernet cable or; 2.4 GHz Wi-Fi with WPA or WPA2, no captive portal. If internet access is restricted by a firewall, ensure TCP post 443 is open. Distance Wi-Fi router to Hydraloop > 1 m. |
| Water hardness: | max. 7° dH / 7 GPG / 120-180 ppm |
| Req. ceiling height: | 2400 mm |
Output specifications #
The recycled water from Hydraloop is suitable for toilet flushing, washing machine, garden irrigation, topping up swimming pool and cleaning purposes.
| Output Outlet | Water Delivery | Pipe size |
| Toilet | permanently pressurized | 1/2″ BSP |
| Washing machine | permanently pressurized | 1/2″ BSP |
| Auxiliary * | only pressurized before transfer to T3 when T3 is full | 1/2″ BSP |
*Auxiliary outlet will be activated after order as add-on.
All tap points that receive recycled water from the Hydraloop must be identified with a non-potable water sign (3 stickers come with device).
Distribution pump performance: #
- Nominal pump pressure: 2.1 bar / 210 kPa
- Nominal flow: 12 l/min
Input specifications #
Hydraloop requires a backup water connection.
The backup water connection is in the distribution unit (“D” in schedule).
Backup water can be mains (tap) water, treated rainwater or treated well water.
| Input Outlet | Water Delivery | Pipe size |
| Backup water | permanently pressurized min. 12 l/min required | 1/2″ BSP |
The backup water enters the Hydraloop via a safe air gap (T4), ensuring no possible connection between (recycled) grey water and backup water.
Specifications #
| Hydraloop H300 | |
| Volume | 300 liters |
| Nominal cleaning capacity | 360 liters (depending on user behavior) |
| Voltage | 120 / 240V, 24V internal |
| Average power consumption | 220 kWh/year, 25W during treatment |
| Internet | The Hydraloop device needs to be connected with internet through an ethernet cable or an internal Wi-Fi-network. Note: Wi-Fi router must be > 1m from Hydraloop |
| Greywater input sources (possible) | Shower, Bath and Washing machine (with inlet diverter) |
| Sound Pressure (Lpa) level at various treatment stages | Interval / duration | |
| Airpump | 29 dB(A) | Daily / long |
| Distribution pump | 29 dB(A) | Daily / with use |
| Greywater flow into Hydraloop | 49 dB(A) | Daily / with use |
| Backup water filling | 48 dB(A) | Weekly / depending on user behavior |
| Inlet diverter open/close | 50 dB(A) | Depending on user behavior / when recycling greywater from washing machine |
| Self-cleaning cycle | 50 dB(A) | Weekly / short |
Dimensions and weights #
| HYDRALOOP MODEL | WIDTH (MM) | DEPTH (MM) | HEIGHT (MM) | DRY WEIGHT (KG) | WET WEIGHT (KG) |
| H300 (Inlet standard) | 800 | 360 | 1985 | 82,5 | 383 |
| H300 (Inlet Diverter) | 800 | 360 | 1990 | 83,5 | 384 |
| H300 PACKAGED | 815 | 800 | 2050 | 90,5 – 92 | – |
For technical detailed drawings, see the following pages.
Glossary of terms #
Auxiliary Outlet
A non-pressurized valve that distributes reusable water for garden irrigation or pool top-up, depending on the region. Water is only available when present in the holding tank (T3) or as controlled by the HDM.
Backup Water
The primary water source for a building, such as mains tap water, municipal water, treated well water, or treated rainwater.
Wastewater
Highly contaminated sewer water containing pathogens, originating from toilets, bidets, hand showers, floor drains, dishwashers, and kitchen sinks.
Greywater
Lightly contaminated domestic water from baths, showers, and washing machines.
Hydraloop App
A smart app for monitoring Hydraloop device performance, offering water-saving tips, and sending notifications. It alerts users when the device is ready to distribute reusable water (after 21 days and 20 showers/baths).
Hydraloop Device Manager (HDM)
An online platform for installing, testing, verifying, and managing Hydraloop devices. It enables monitoring, maintenance, troubleshooting, and ticket generation. Login credentials, provided by Hydraloop, are required before installation.
Inlet Diverter
An optional valve that allows greywater intake from sources other than showers/baths, required when adding washing machine water.
Recycle Ready Guide
A guide for owners, plumbers, and contractors on preparing a building’s plumbing system for greywater recycling.
Recycle Ready Checklist
A required checklist, signed by the responsible party to prepare the buildings’ plumbing, ensuring the system is ready before installation can be scheduled.
Reusable Water
Recycled greywater used for toilet flushing, washing machine, or outdoor applications.
Start-up Time
The Hydraloop device needs at least 21 days and 20 showers to establish its biological treatment process. If fewer than 20 showers occur within 21 days, the start-up period extends.
Open to Air Ventilation
A ventilation system preventing siphoning in the greywater line. Ensure proper two-way ventilation for both greywater input and sewage output, with the greywater vent terminating outside the building.